
Introduction
Oh my goodness! Today I'm sharing an amazing home improvement hack! As a recent graduate who just started working, I totally understand the importance of saving money. I bought a side table from IKEA the other day, and while I was planning to use it as is, I noticed all my neighbors had the same style. It felt so generic. Then I had an idea - why not give it a makeover? I ended up spending just $100 to transform this ordinary little table into what looks like high-end furniture. The result was so stunning that even my mom couldn't believe I did it myself!
Design Concept
To be honest, I really like IKEA's designs, they're just too common. I bet eight out of ten households in our complex have identical furniture - who can stand that? But after this makeover, I discovered that with some creativity, you can reinvent any IKEA piece.
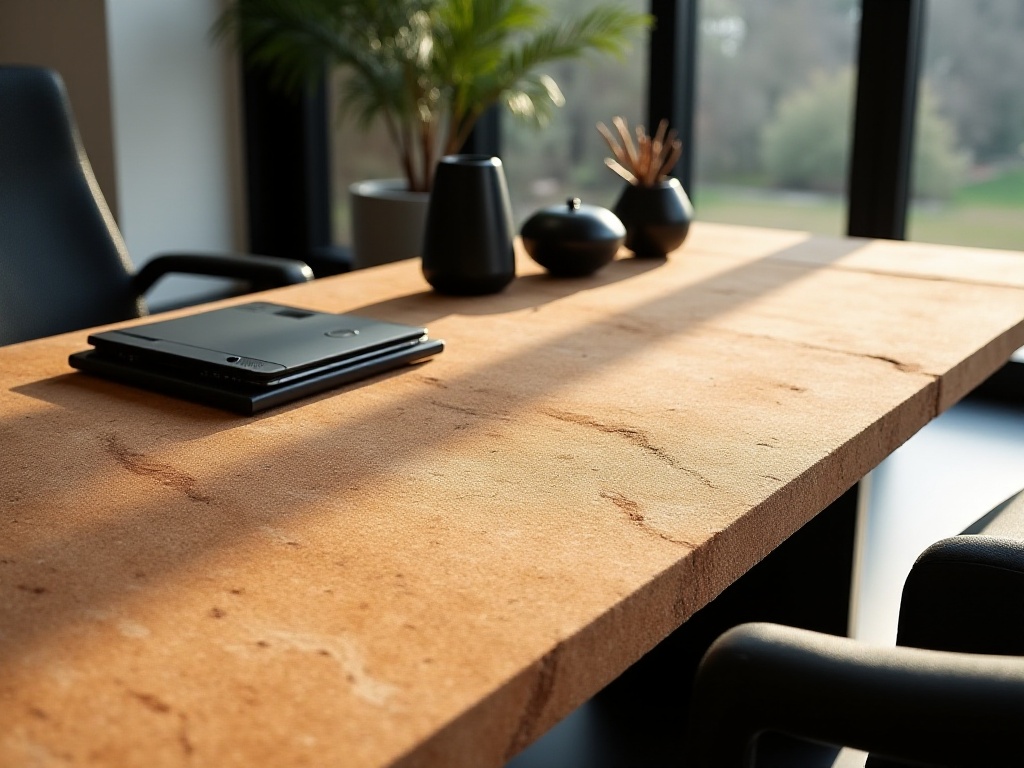
Take this LACK side table I transformed - it only cost $39, almost embarrassingly cheap. But you won't believe how I turned it into something that looks like boutique furniture! I visited some high-end furniture stores the other day and saw a similar-styled side table selling for $1,200. I couldn't help but laugh, thinking: this is something I could do myself!
Most importantly, this makeover taught me that high-end appeal isn't about price. Sometimes, with clever tricks, ordinary furniture can be transformed into something stunning. Plus, DIY projects give you such a sense of achievement - I can't help but show off every time I see this table: hey, I made this myself!
Detailed Steps
The materials needed are super simple. Besides the $39 IKEA LACK side table, you only need a few things: A cork board from the hardware store, $35; a can of water-based paint, $30; and some sandpaper, $5 is enough. I bought all these materials at the hardware store near our complex, though I later found they might be cheaper online. I suggest comparing prices - save where you can!
Let me detail the process. The first and most important step is sanding. Honestly, this step is the most annoying - I messed up my first attempt by rushing it, and the result was terrible. Had to start over. Now I realize it was a waste of time not doing it properly from the start. Make sure to use fine sandpaper and be patient until the surface feels completely smooth. It took me about 40 minutes, changing sandpaper several times.
The second step is applying the cork board. This looks simple but requires technique. Don't make my first mistake of just sticking it on directly. The correct way is to measure and mark the dimensions precisely on the table surface, then carefully cut the cork board with a utility knife. My first attempt was too rushed, resulting in uneven edges that looked amateur, so I had to buy another piece and redo it.
The third step is painting, which really tests your patience. I chose water-based paint because it has less odor and is easier to clean. When painting, remember to apply three thin layers, waiting for each layer to dry completely before applying the next. I learned this the hard way - being too eager to apply the second layer before the first was dry resulted in bubbles forming, forcing me to sand everything down and start over.
There are tricks to painting too. Thin down the first layer for better coverage; apply the second layer normally for coverage; the third layer is crucial - use the finest brush and paint slowly for a perfectly even surface. I noticed that professional furniture looks high-end because of their perfectly even finish.
Advanced Techniques
After covering the basics, let me share some advanced techniques to make your table even more unique!
For an industrial look, try spraying metallic paint on the cork surface, then lightly sand it for a distressed effect. I've seen this style on Pinterest, and it looks amazing! Just be careful with the sanding pressure - too heavy will remove all the metallic paint, too light won't show the effect. It takes practice to find the right touch.
If you're more artistic, try drawing simple patterns on the cork board. Don't worry if you're not good at drawing - there are lots of simple, attractive sketches online you can copy. I drew some basic geometric shapes on my table surface, and the result was surprisingly good!
For a luxurious touch, try adding copper strips to the edges. I got this idea from a high-end furniture store where they were selling tables for over $10,000 with this design. I bought some copper strips on Taobao for just over $20, and it instantly elevated the look! Just be extra careful with alignment to maintain a professional appearance.
I'm also considering trying an epoxy resin tabletop. This might be more technically challenging, but the result should be cool. I've watched many videos on Bilibili, and I think I can handle it!
Money-Saving Tips
As a seasoned money-saver, I think it's important to detail how to minimize costs.
First, timing is crucial when buying materials. I've noticed many hardware stores have special deals at the beginning of each month, with some materials discounted by about 30%. It took me several months to notice this pattern, but now I time my purchases perfectly, saving quite a bit.
Also, utilize social networks. I've joined several renovation material WeChat groups where you can find group-buying opportunities. Last time I bought paint through group purchase, I saved half the cost! But be careful to buy genuine products. I've seen people trying to save money by buying fakes, only to ruin their furniture.
As for tools, borrow whenever possible instead of buying. Things like sanders might only be used once in a lifetime, so buying them is wasteful. Our complex has a tool-sharing group where we borrow from each other, saving money and meeting neighbors. I once met a neighbor who was also renovating furniture while borrowing a sander - we became friends and often share renovation tips now.
Another money-saving tip is to follow renovation bloggers. They often share deals and detailed product reviews, helping you avoid pitfalls. This is how I learned about many good-quality budget alternatives.
Lessons Learned
This makeover taught me a lot. The biggest realization was that many expensive-looking pieces of furniture aren't actually that complex in design. With time, thought, and willingness to work with your hands, you can create professional-looking results on a tiny budget.
I calculated that this makeover cost 109 yuan total ($39 table + $35 cork board + $30 water-based paint + $5 sandpaper), which is incredibly economical compared to designer furniture that costs thousands. While the renovation process was a bit tiring, it was incredibly rewarding. Now whenever friends visit, they exclaim: "This is really an IKEA table? It looks amazing!"
If you want to try furniture renovation, I suggest starting with simple projects. This makeover I shared is perfect for beginners. Once you gain some experience and confidence, you can try more complex projects. Don't worry about failing - the cost is low, so you can always start over. I've failed several times myself, but each failure taught me something new.
By the way, if you have similar renovation experiences, please share them in the comments! Your experience might help others! Through exchanging ideas, we can learn from each other and improve together. I often learn really useful tips from the comments section - these experience shares are invaluable!
Finally, I want to say that furniture renovation isn't some profound skill - it's about having ideas and being willing to work with your hands. As long as you're willing to try, you can create your own unique furniture. Like this makeover - while it only cost $100, the quality and design rival those thousand-dollar pieces. Most importantly, it's completely your own work, and that sense of achievement is priceless!